Sql Database Design For Beginners

When I started learning to be a Data Analyst in November 2021, I was confused about a lot of things, most importantly, I didn’t have an idea of what simple beginner project I could do to build my portfolio.
This is part one of a two or maybe three-part series that will show you how to build an awesome project for your Data Analyst portfolio. This is a project that will demonstrate to any potential employer, the different skills you’d be required to have for working with SQL Databases.
In this article, I’m going to take you step-by-step through the process of building a relational database in MySQL with cool tools you can use to make your job a lot easier.
We’d be using a real-world scenario but keep it as simplified as possible to keep the project more manageable.
Here is the scenario: “The Client Kori is opening up a massive retail store alongside a website for her clothing business in Lekki Lagos. Her goal is to be one of the biggest retailers of Urban Streetwear in Nigeria. She has given us a project brief; the first part requires us to design and design a tailor-made bespoke relational database for her business, that will allow her to capture and store all important information and data that the business generates. This will in turn help Kori monitor business performance in dashboards. We’re just taking care of the backend as she’s hiring someone else to build the frontend of the ordering system.
There are 3 main areas that the brief requires us to concentrate on:
Customer Orders
Stock Control
Staff
Let’s start with Customer Orders
The way we’ll approach this task of designing our database and the tables in it is to map out all the fields for the data we want to collect, then we’ll go about the process of normalizing the data, adding more related tables and defining the table relationships.
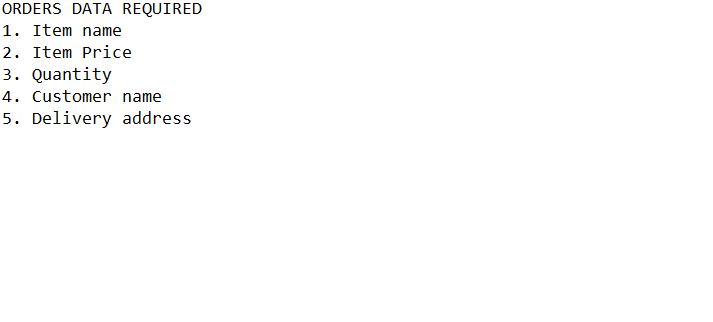
The image above shows a list of different data Kori would like to collect for each order. This list is only the starting point for us to map out all the fields we’ll need for our orders table.
We know we’ll need to include things like the Order Id field and split out delivery address into different parts and we also understand that from the brief Kori gave to us about her business, there are different sizes and categories of clothing items, so we can include this as a separate field.
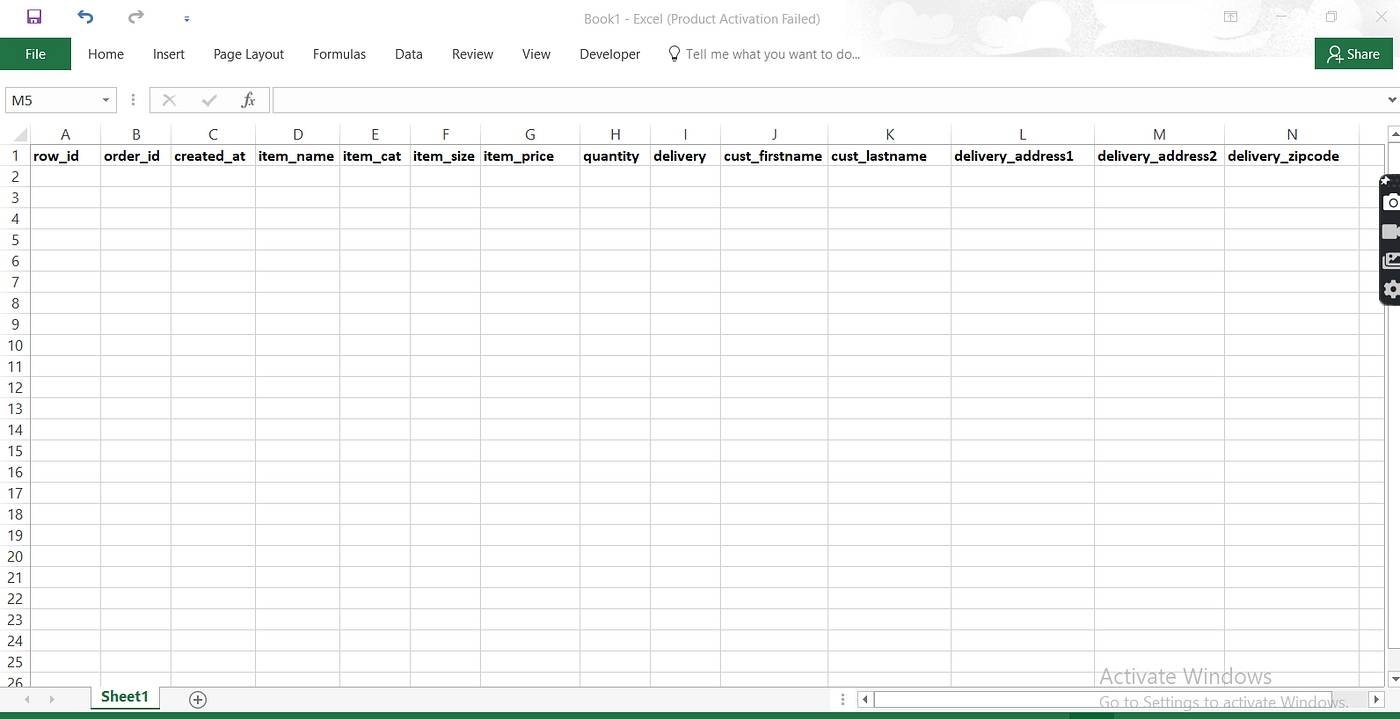
The image above is a mock-up in excel of what the table could look like. We have our order Id and the delivery address has been split into different address parts. Also, notice that Row Id has also been included. Why did I do this?
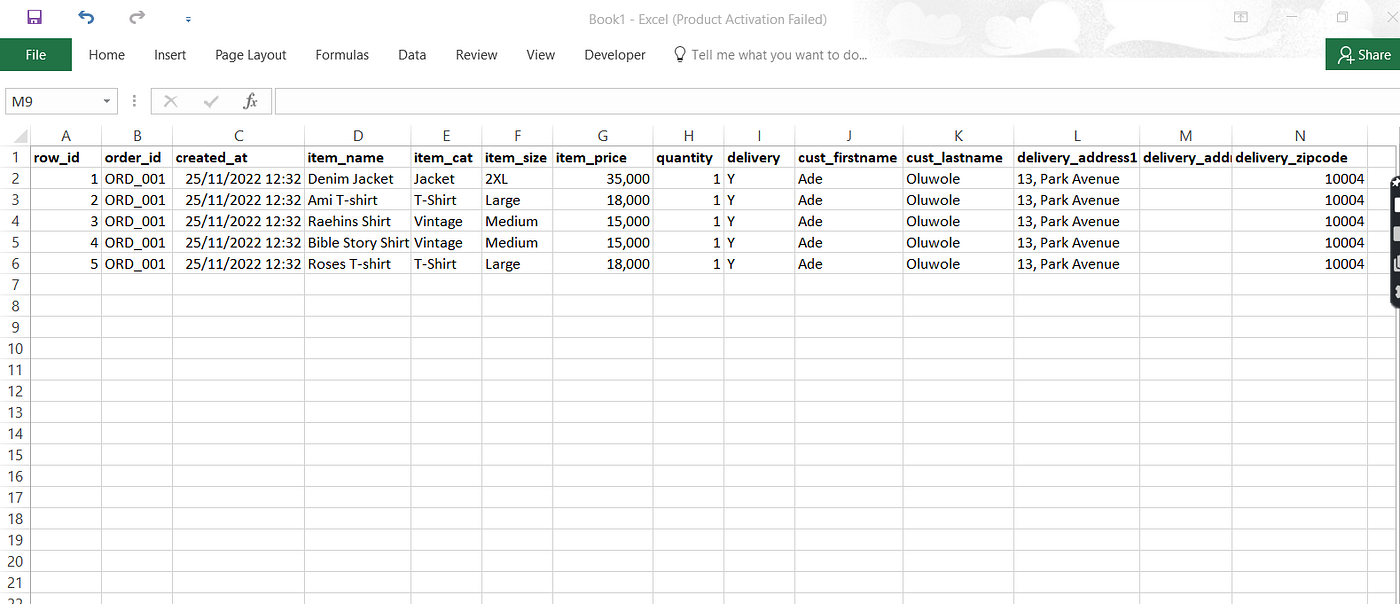
Let’s enter data for a sample order, you’ll notice that each order can contain multiple items, therefore, we can’t use it as a primary key to identify each row. Hence the Row Id that will serve as our primary key.
If you also look closely at the data for this sample order, you’d notice that we have a lot of repetition of data in the various rows, this is called REDUNDANCY and the way to fix it is by what’s called NORMALIZATION. This is the process of organizing data to reduce redundancy and improves efficiency. We’ll expand more on how to go about normalization when we’re creating the tables.
Now that we have an idea of the fields we need for the orders table, I’m going to show you a cool tool we can use to make our job of building and designing databases much easier. It’s called Quick DBD (Quick Database Diagrams).
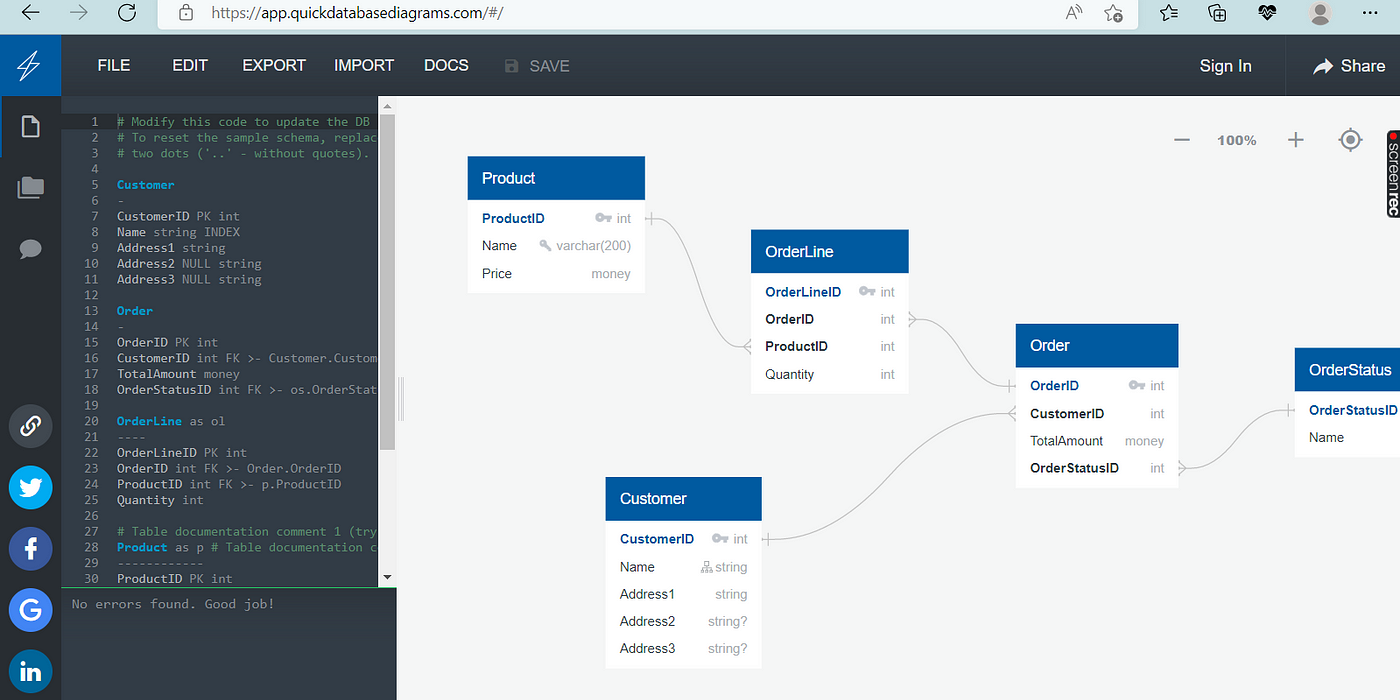
You specify on the left, the tables and their fields and the right, this produces a diagram of the database and its tables.
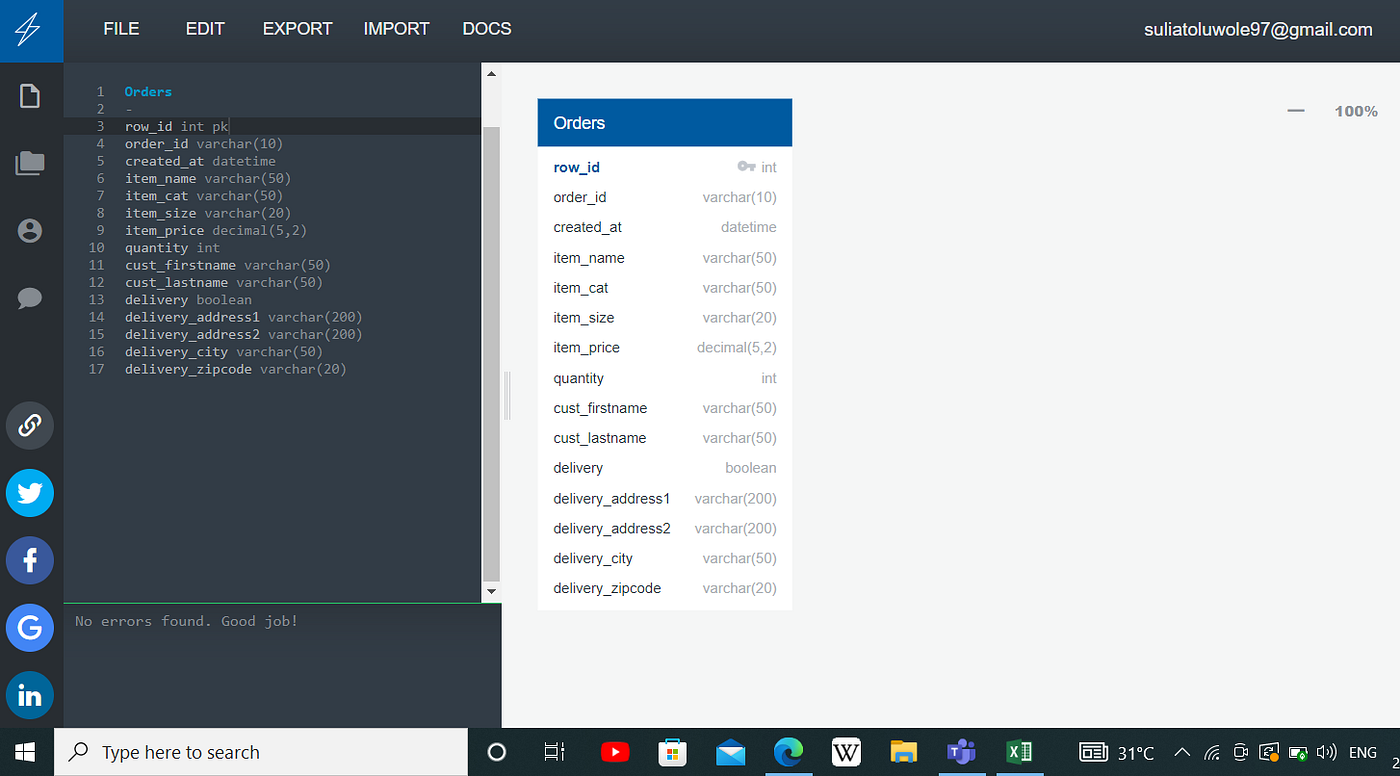
From the orders table created above, it is noticed that you need to specify the field name followed by the data type and for row_id, we added “pk” after the data type to indicate it as the primary key.
Remember when we spoke about normalization, what we want to do is create new additional tables. So instead of using all these different fields in the orders table, we can just use an identifier instead. This will in turn make the database more efficient.
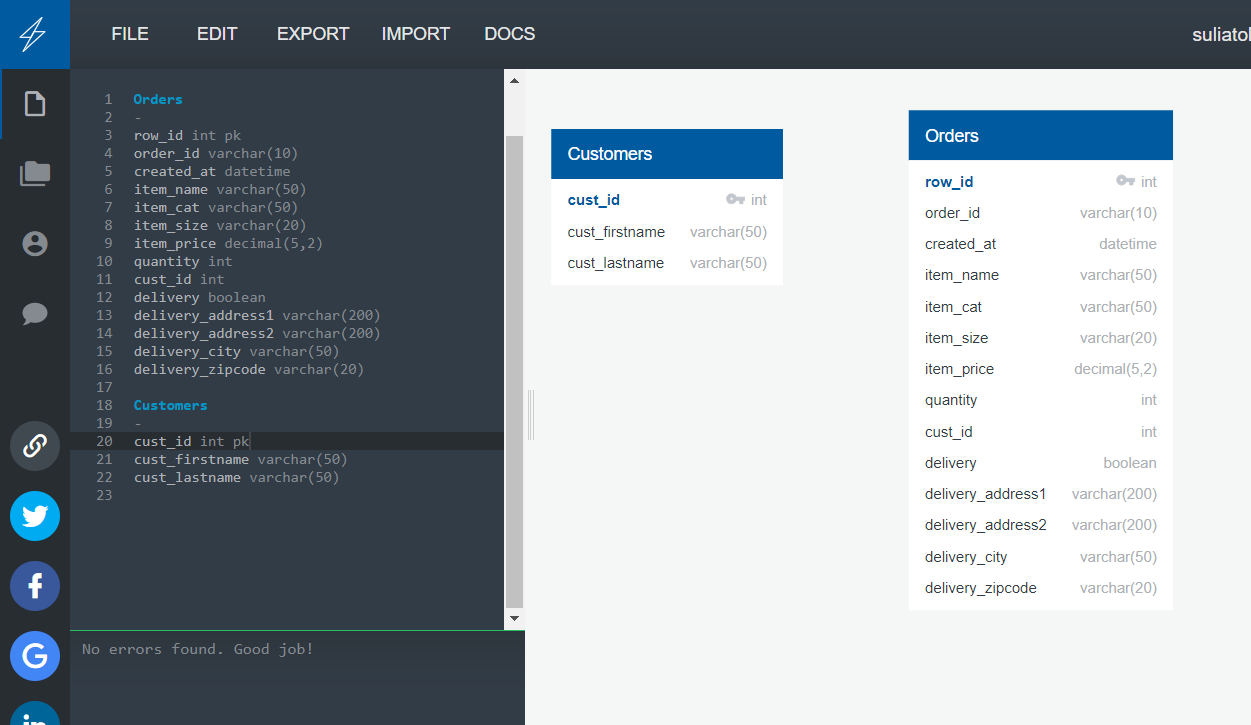
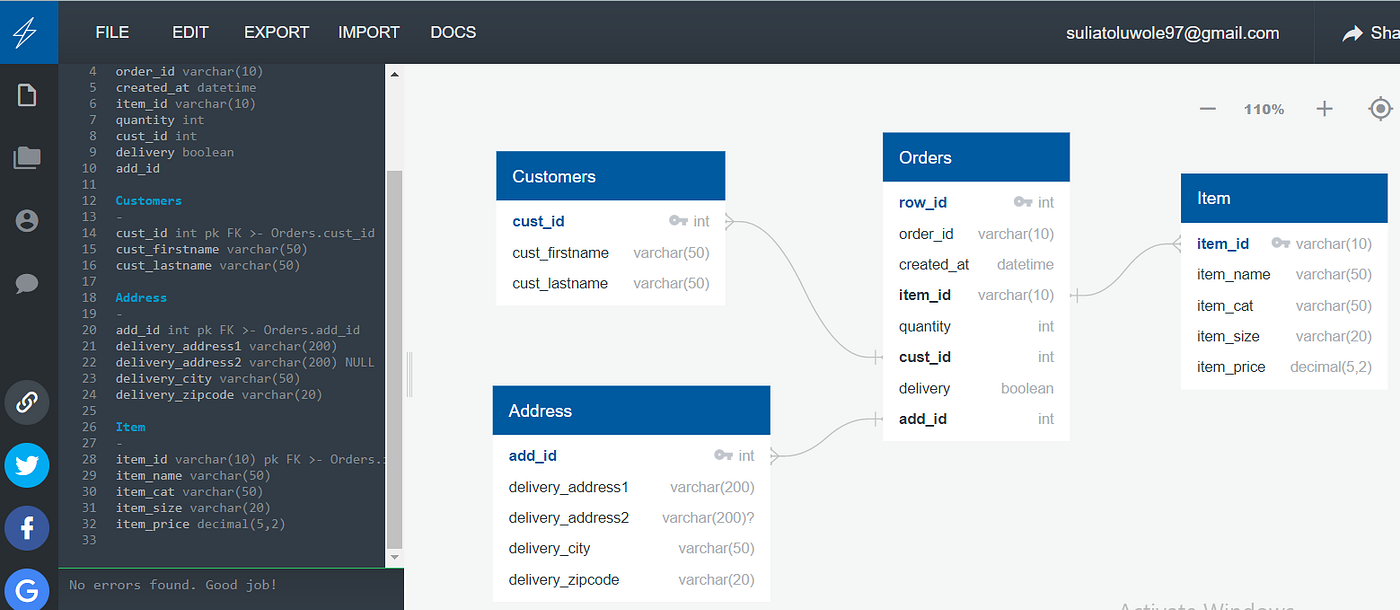
Let’s start with customer names: In the orders table, we have two fields, first name and last name. To create a customer table, on the left, we’re going to write the table name “Customers”, return, one dash (-) and click enter. You’ll see that a new table has been added to the diagram. In this Customers table, we’re going to start by adding cust_id with an “int” data type and also as a primary key “pk”. Then we’ll cut out the two customer field names from the orders table and paste them into our new customers table. Now we replace the two fields in the Orders table with the cust_id field as an identifier. Refer to the image above to see the result you should have.
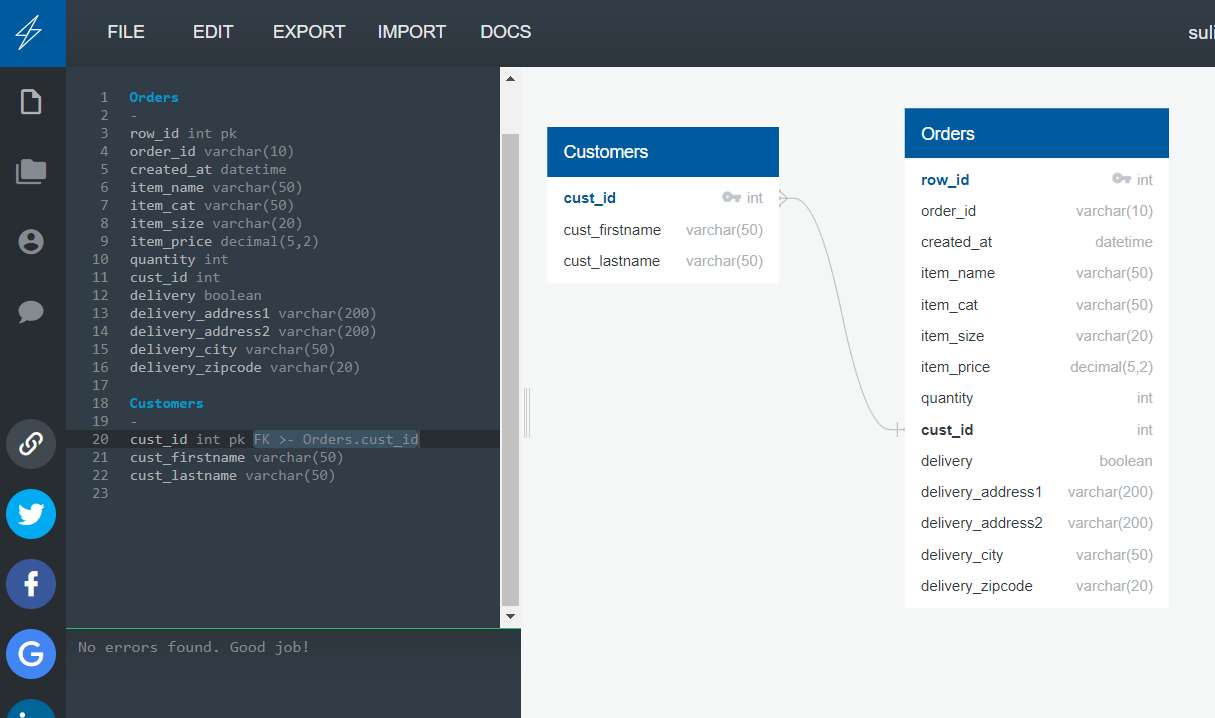
All we need to do is specify the relationship between both tables by dragging from cust_id in the customers table to cust_id in the orders table. In the syntax on the left, we can see that cust_id has now been specified as a foreign key connected to orders.cust_id.
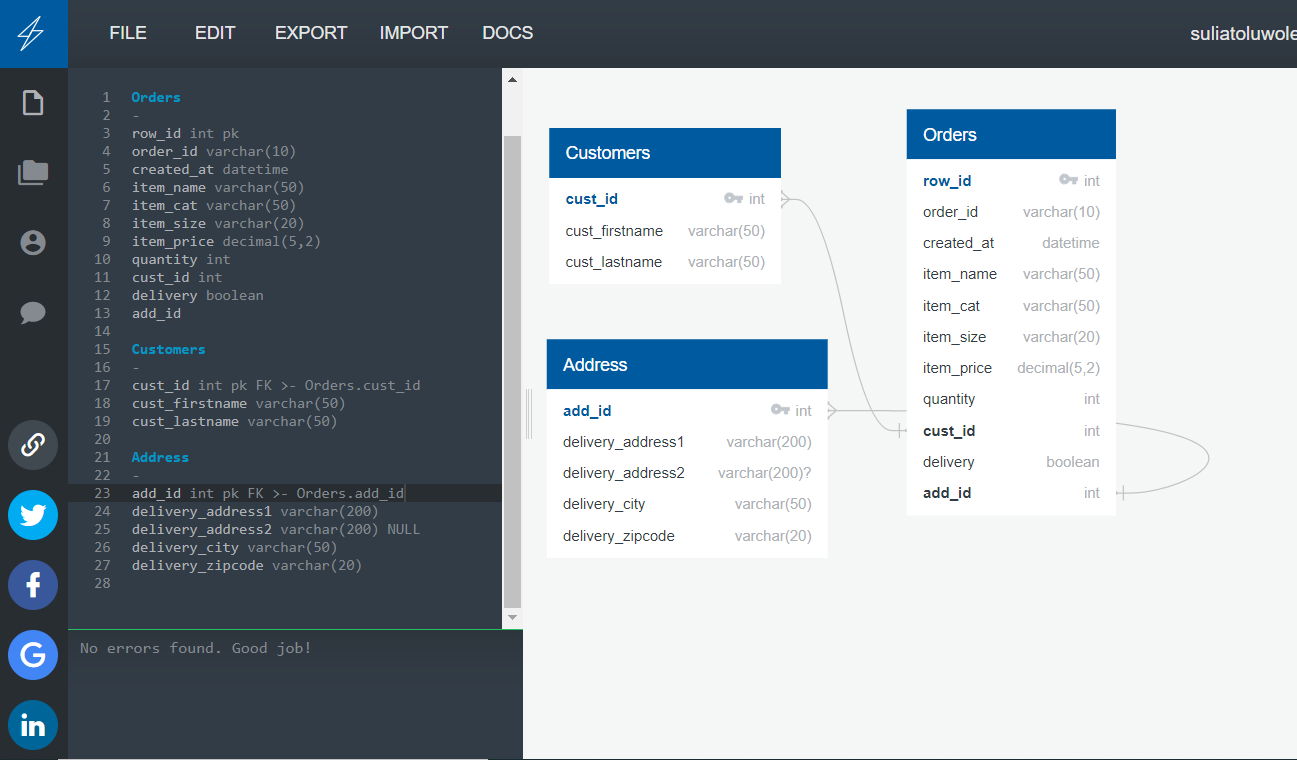
Let’s do a similar operation for our delivery addresses:
Create a new table called Address
Add an add_id field with an int data type and make it a primary key
Cut the delivery details from the Orders table and paste them into the new address table.
Make sure to replace the cutout delivery details in the order table with the add_id field
Add a NULL constraint to the delivery_address2 because by default, Quick dbd applies the NOT NULL constraint to every single field. Meaning that it cannot contain NULL values. However, the delivery_address2 is not always needed so it can be NULL.
Specify the relationship between the address and the order table. The image below is a representation of what your syntax field and diagram should look like.
Next, we have to create a Product/Item table. This will serve 2 main purposes:
It’ll reduce the amount of data in the Order table like with the other two newly created tables
Let’s imagine at some point, Kori might want to change the name of an item. If we have an item table containing a list of all items in store, it’d be easier to change one row of data in the table as opposed to changing all the rows in the Order table where the items existed. Always remember, the goal is to make our database more efficient.
We’re going to go ahead and create a new Item table and specify the relationship just as seen in the image below.
Now that we’ve completed the Customers Order part from Kori’s brief, the next step is the STOCK CONTROL part.
Essentially, what Kori would like to be able to do is put in place a way for her to know when it’s time to order new stock. To do this, we’re going to need more information about the existing stock level and suppliers. With all of this data, Kori will be able to calculate exactly the cost price of each item and also notice any price change. We’d create a Supplier and Inventory table as shown in the image below.
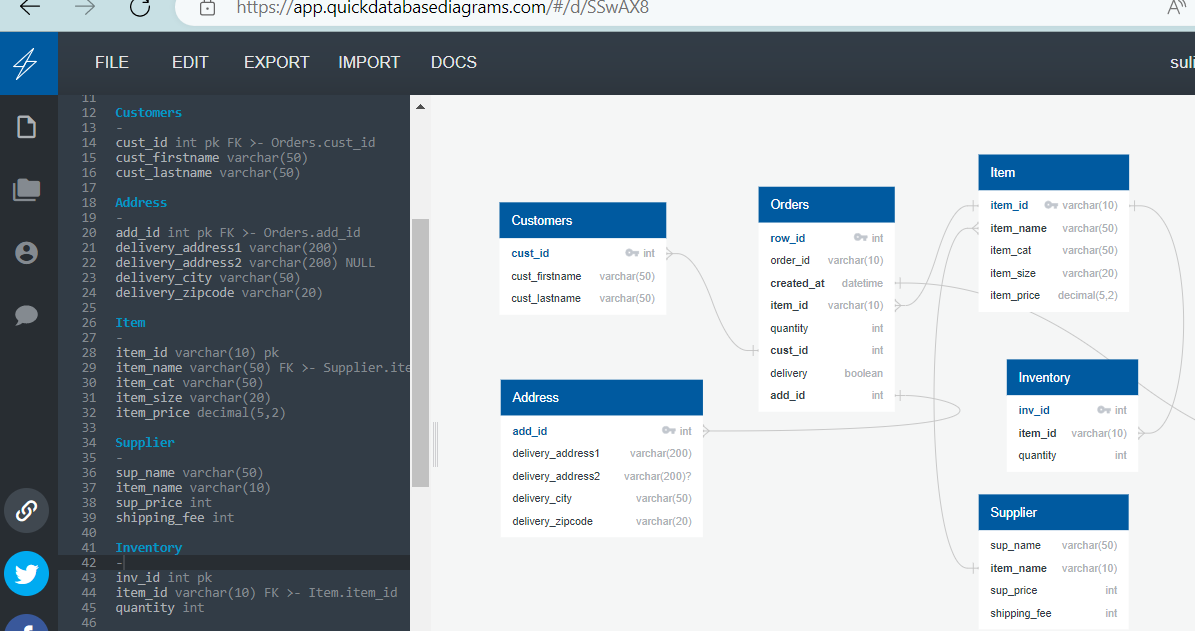
Supply & Inventory Tables after establishing relationships
The final part is STAFF data. According to the brief, Kori would like to know two things:
Which staff members are working when
Based on the staff salary information, how much does each piece of clothing cost
Let’s start with the staff table; we’ll have staff_id, first_name, last_name, position and hourly rate.
Then we have the shift table: we’ll have shift_id, day_of_work, start_time and end_time. Most staff work both the morning and evening shifts on any given day but some do not which is why we need to split them up.
And finally, we have a rotation table: This will tell us who is working and when. For this, we’ll need a row_id, rota_id, date, shift_id and staff_id.
The relationships between the final three tables are:
shift_id from the Shift table to shift_id in the rota table
staff_id from the staff table to the staff_id in the rota table
And finally, date from the rota table to created_at in the Orders table.
This last relationships will give us the join we need between these Staff tables and Order tables as shown in the image below.
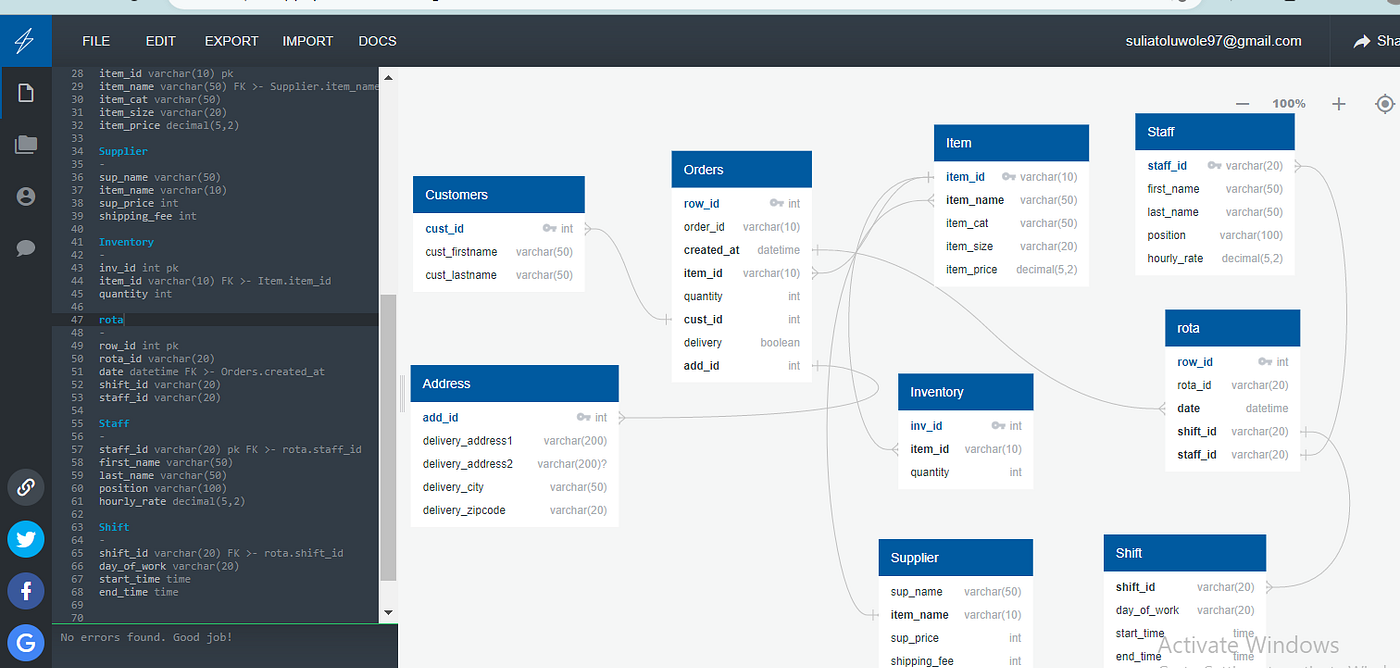
Full simplified database diagram
Now we have everything we need for Kori’s simplified database. Once we’ve designed the database, there’s just a small matter of creating it to be done.
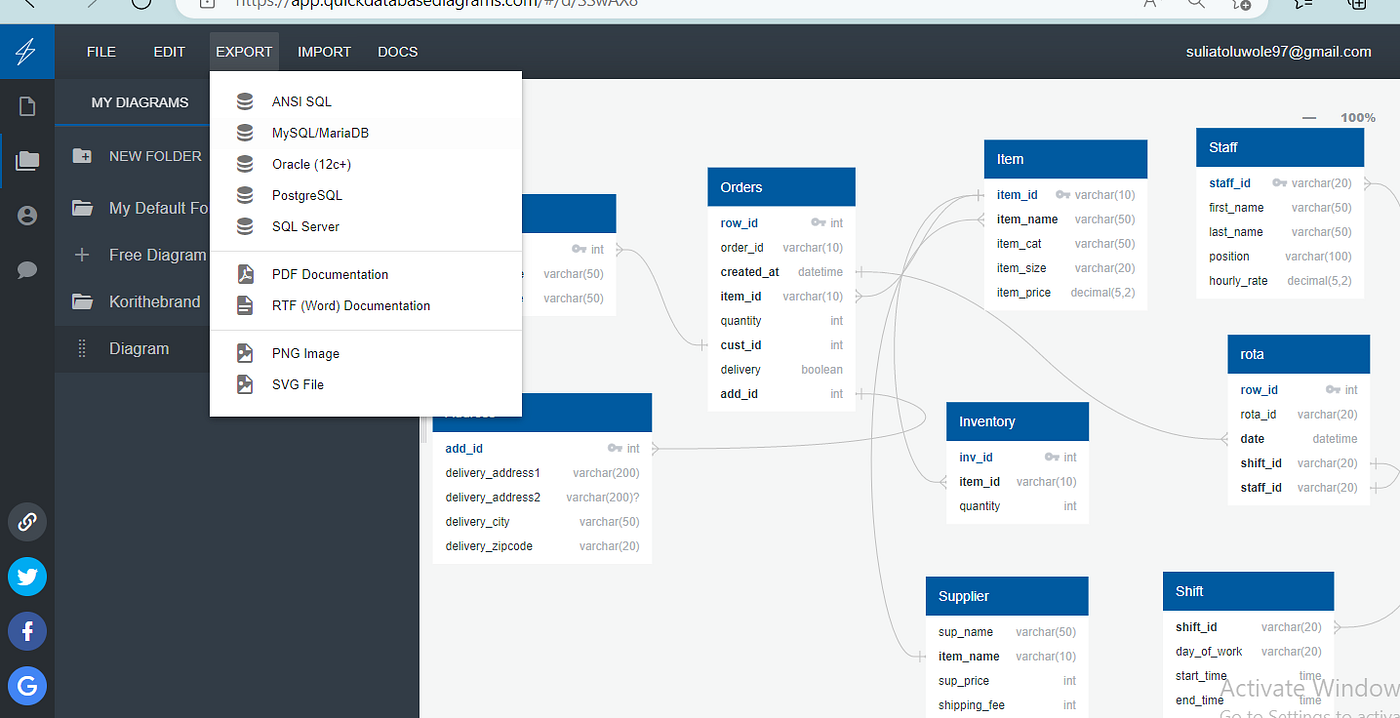
Fortunately, this is where Quick DBD makes work easy. All we need to do is go to the export menu where we can choose to export sql code into a variety of different rdbms syntax. For this project, we’ll be using MySQL.
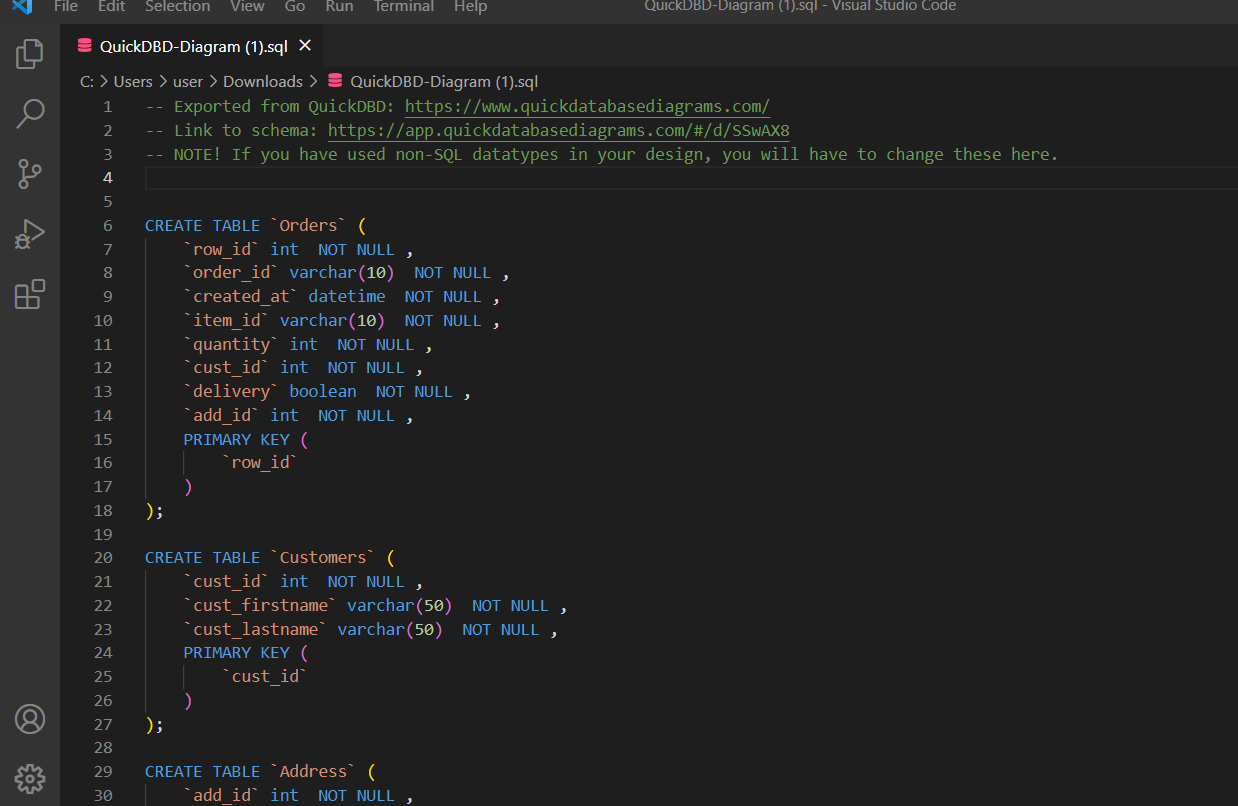
If you open the downloaded file, you can see that it contains all the code needed to create the tables as seen in the image below.
Finally all we have to do is create a connection with an instance on MySql. We ’ll be using MySQL Workbench (How to install MySQL Workbench).
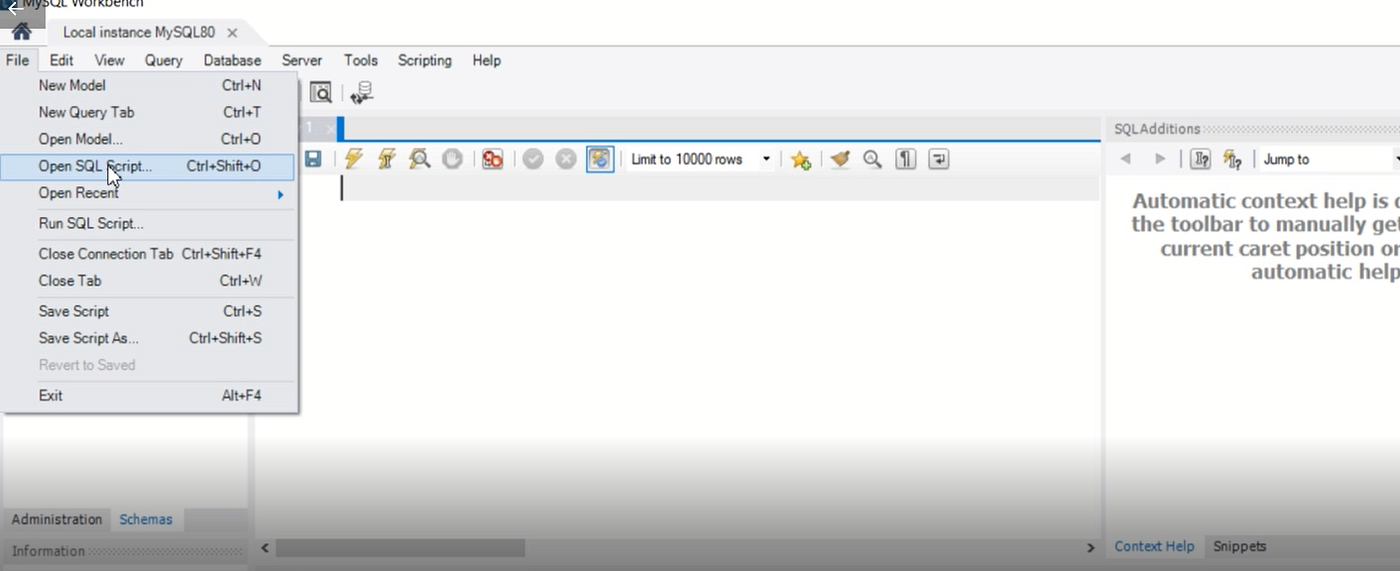
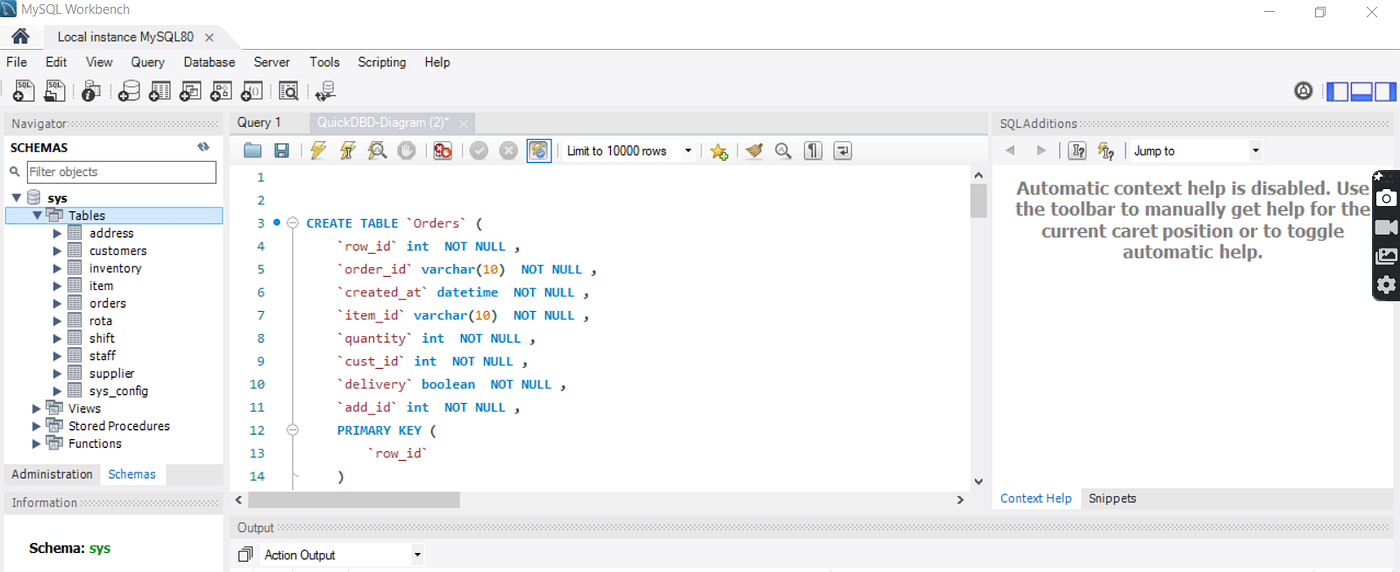
In the workbench, go to the file menu, click on “Open SQL Script” and import the sql code we downloaded earlier as seen in the image below. When you execute the code, the tables in the database should be created and will be seen under the schemas sections on the left side of the workbench.
Now that we have created a simplified database for Kori, all we have to do is populate the database with data. A step-by-step guide on how to populate data in a database using MySQL Workbench will be attached to this article later (hopefully).
